


Bed Construction for my 1946 Dodge Power Wagon
Could have kept the old home made wrecker/gin pole bed or purchase a pick-i[ bed for the truck, but I wanted a Stake Bed for this Power Wagon.
|
|
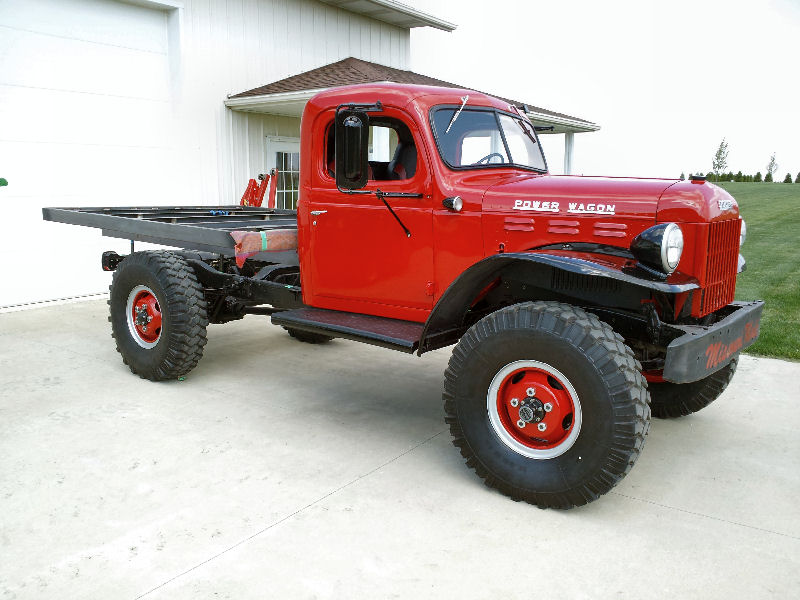
I'm going to design and build a Stake Bed that is a little vintage and similar to the one in this Dodge Factory Photo. When you enlarge the image, the lower picture will be about how high mine will ride, the bed approximately 48" off the ground. this is to accommodate the potential 8" axle travel, and slightly larger tires. | |
|
|
Well, I finished the major design changes and ordered the Steel. I was able to buy the steel on-line and pay delivery and get it cheaper than I could locally. Thanks Metals Depot. While I was ordering I also picked up some materials to make the M's new stronger running boards, and a lower skid for them. Well, with the steel, I fabricated the perimeter and attached the main beams. 2012-04-22 | |
|
|
I didn't like the square corners, and had ordered a piece of 4" OD 120 wall material to use for the corners. Today I cut, welded and smoothed to round the corners. They came out pretty decent. I also started the cross stringers that will be used to support and hold the 5/4 wood floor. 2012-04-23 | |
|
|
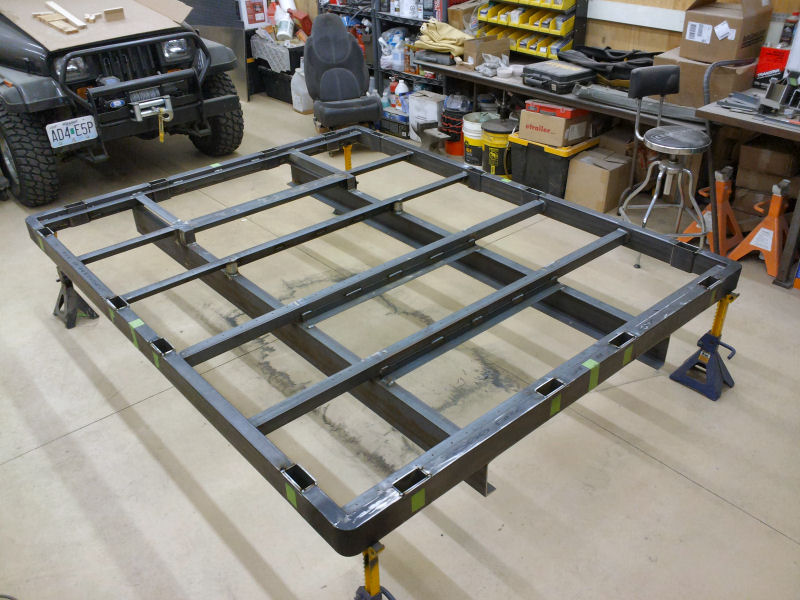
Finished fabricating and welding the bed frame together. It's complete except for the Stake Pockets and the rear frame close out section. I won't fabricate the stake pockets until I have the lumber, and the rear close out after I test install the bed on the truck. 2012-04-24 | |
|
|
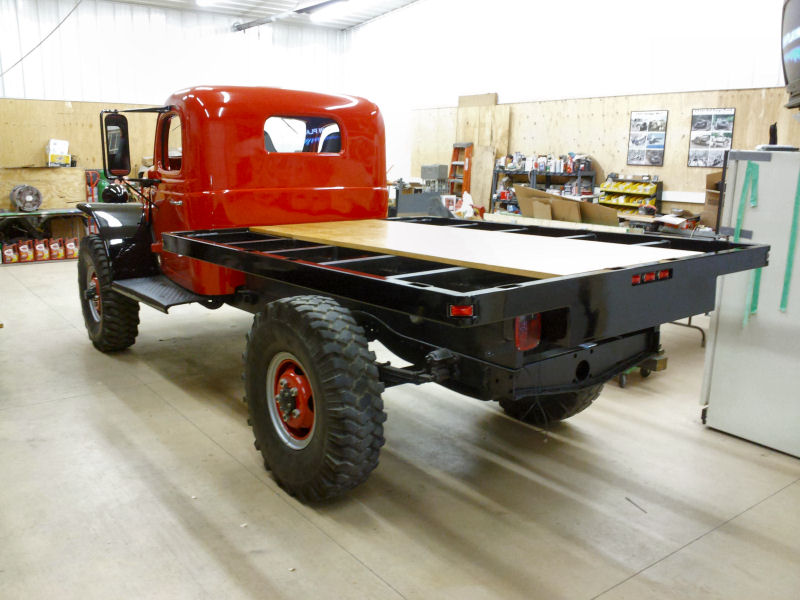
This afternoon I cut a test board, and some temporary supports to test install the bed frame. I then did the test install, and it went pretty good. The board isn't straight enough to get it installed exactly square, but mounted very, very close to its correct location. Looks like rather than 1.5" clearance to the cab, I'll only have 1", but that's more than the stock pick-up bed. The front under bed storage area looks like It will be over 18" deep, and it's 18 x 36 in the other two directions. From inside the cab through the mirrors the bed looks like it's too far to the driver's side, but looking closer and measuring it's only off about 1/4". The rear of the bed is 48" off the ground, while the rake of the truck puts the front at 46" high. As compared to the first black and white factory truck picture above, my final bed location is between the factory height and my mocked up version. 2012-04-26 | |
|
|
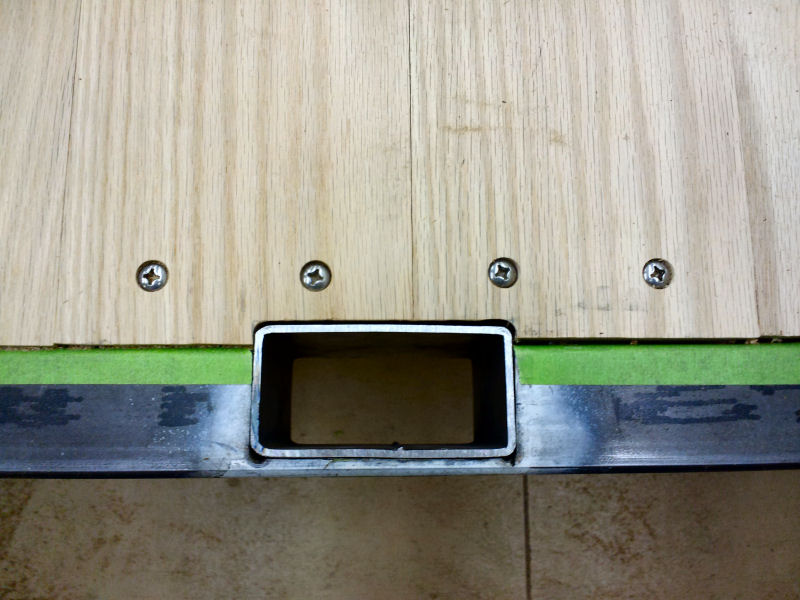
Well, I got my Wood! Now that I had the stake pocket materials, and it is indeed a nicely finished 1.5x3.5 I started mocking up or testing my idea for how to cut in and install my bed stake pockets into the side tubing. The idea was to cut a piece of the tubing down and weld it back to a decent fit around the wood (PIX), then cut a hole in the top and bottom of the side tube around the bed and weld it in. Dimensionally it should work, the ID of the bed tube is 1.76 (2-0.120-.0120), the outside of the stake pocket would be 1.74 (1.5+.012+.012), however I might have added a little too much free space around the 2x4 as it was larger than 1.75 when I had it welded up, and no way it was going to fit. So back to the drawing board. I tried another idea to sink the pocket totally inside the side tube, but no luck. Now the idea is to use a piece of 2" x 4" x 3/16", giving an inside pocket dimension of 1.625" x 3.6375", hopefully not too much slop around the 2x4. Take a 4" length of this new tube and cut a slot through the outside of the bed frame tube, and insert the piece (PIX1, PIX2). This will stick out 1/4" pact the bed, but at least a relatively easy cut and weld (PIX). Now the pocket tube you see isn’t the 3/16” thick material as I don’t have any on hand, it’s a 120 wall piece. The needed steel is on order and I'll work on some of the wood for the floor while I wait again. One other thing, we (Collette and I) have selected the finish for the wood. To add some richness we have decided to go with a Natural Oak Stain, and then protect it with Polyurethane. 2012-05-11 | |
|
|
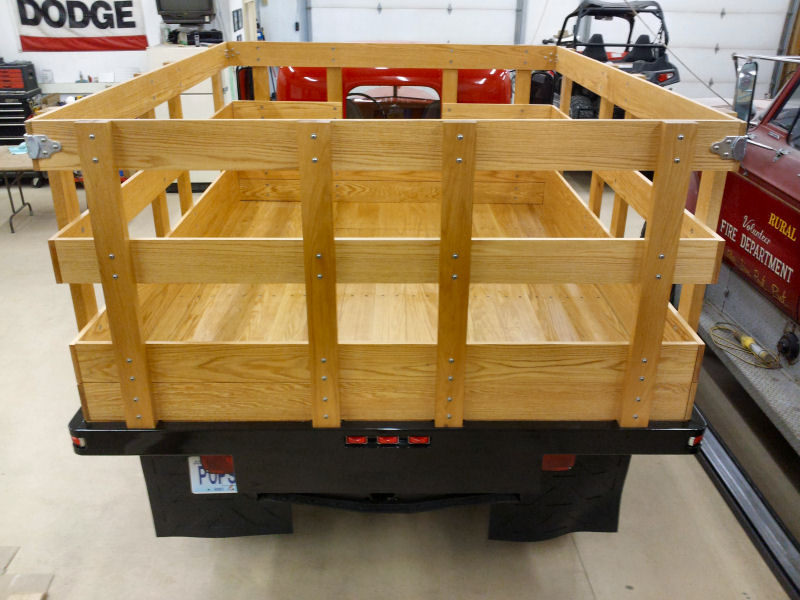
After having made the decision on the stake pockets, this afternoon I edited my design and calculated the final stake pocket locations. I moved them inboard so as to leave the outside of the frame smooth. In the second drawing you can see the evolution of my design, from the original completely inside the side tube, to a welded on stake pocket, to my final decision on the right with the pocket cut into the tube and biased to the inside by 1/4". The stakes sides will be 38" tall. The inside clear dimensions will be 77" x 97". I laid out the sides and rear pockets, and drilled the top holes in the tube for the corners. 2012-05-13 | |
|
|
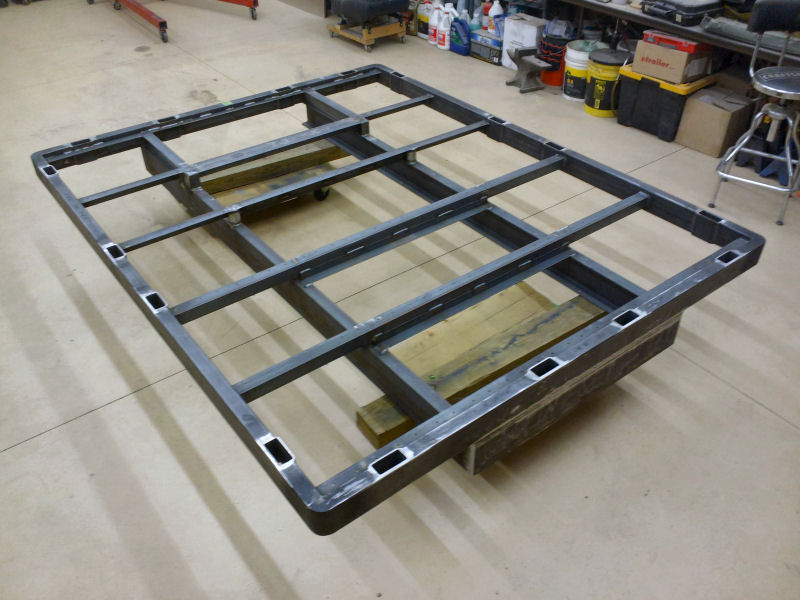
I spent the morning cutting the first four pockets out, the rear ones. I then spent the afternoon and early evening cutting the outer 12 pockets. I removed the bed to make it easy and safe to cut the front pockets. I also added the reinforcement angles to the three center supports to help stiffen the floor. 2012-05-14 | |
|
|
After a trip to the store, I got back to doing a little finish welding on the bottom of the bed frame, and cutting a real rail filler to weld in after I weld in the stake pockets. Next I decided to cut the first pieces of wood. I cut and fitted the two wood bed rails. Came out even better than my test cut on the 2x6 I did earlier. Next I flipped the frame and cleaned it in preparation to start cutting and fitting the wood floor. I'll need to get a better saw blade and some saw horses, but the wood working starts now. 2012-05-15 | |
|
|
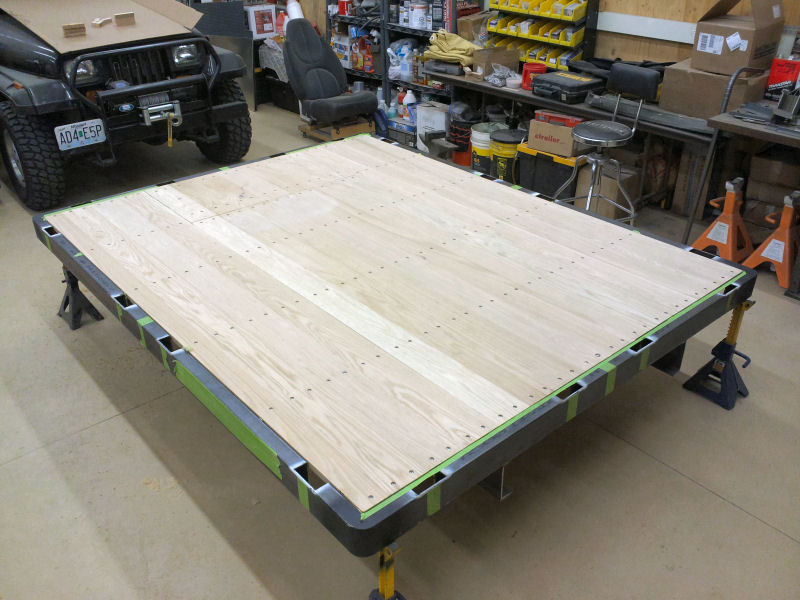
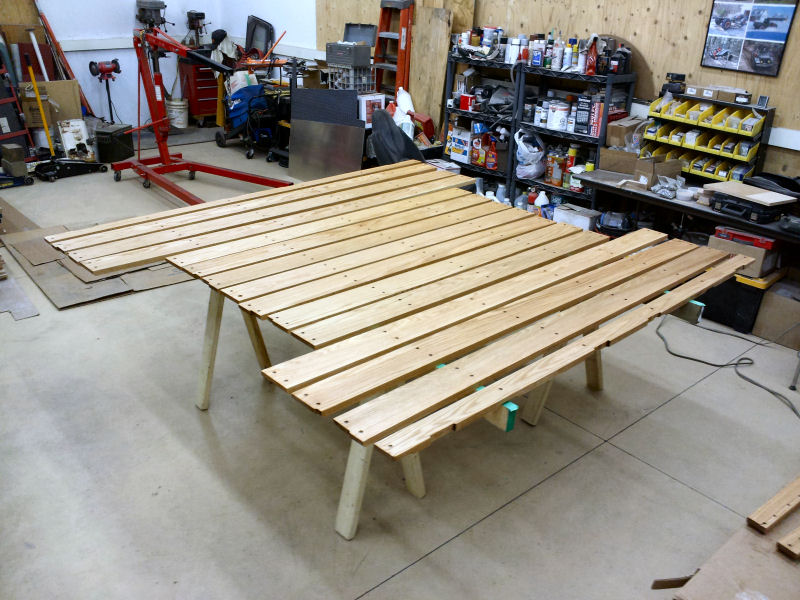
After getting a new fine tooth saw blade, I spent the day cutting, drilling and screwing. Only the perimeter screws are tight, and I still need to cut and bolt the two end strips of wood after they are ripped down to the correct width. The wood was chamfered on the bottom perimeter to clear the welds, and I also need to trim the 1/4 out for the stake pockets. I had one mistake, I used the wrong Forstner Bit for the first screw, so it's a little large, oh well. 2012-05-16 | |
|
|
Well, 182 holes, screws and nuts later the floor is bolted tight ready for pocket trimming and sanding. In the first picture you can see the one holes mess up I had. I grabbed the wrong Forstner bit for my very first hole in the bed. 2012-05-17 | |
|
|
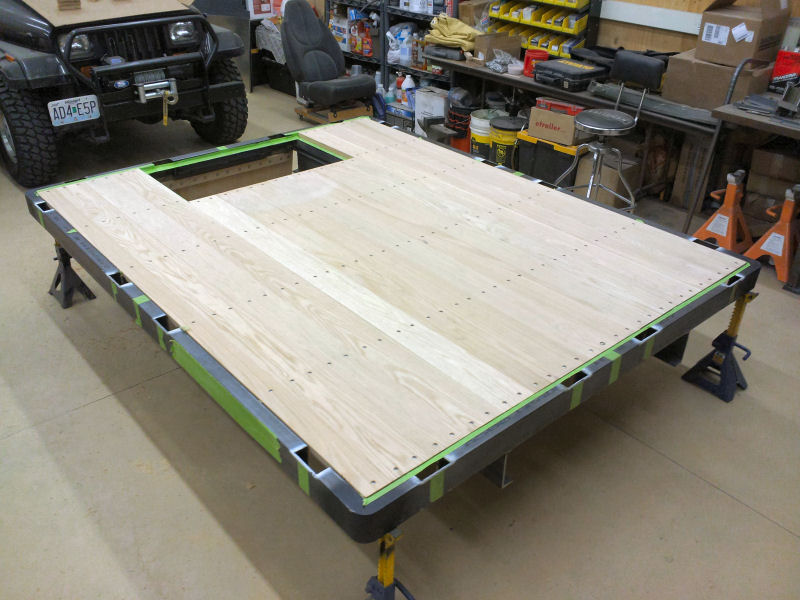
Used the router and cut the wood out to clear the stake pockets. I also sanded the bed wood, and then removed all 182 screws and the bed wood. Next I finished a little underside bevel routing for weld clearances for the stake pockets as well as sanding the underside. Next came the final steel prep for the stake pocket steel that arrived today. 2012-05-18 | |
|
|
Don't you just hate it when you run out of gas, welding gas that is! I did get all the pockets cut, fit and tacked into place before running out of gas. So now I'll have to make a run Monday morning and swap bottles at the welding supply house. 2012-05-19 | |
|
|
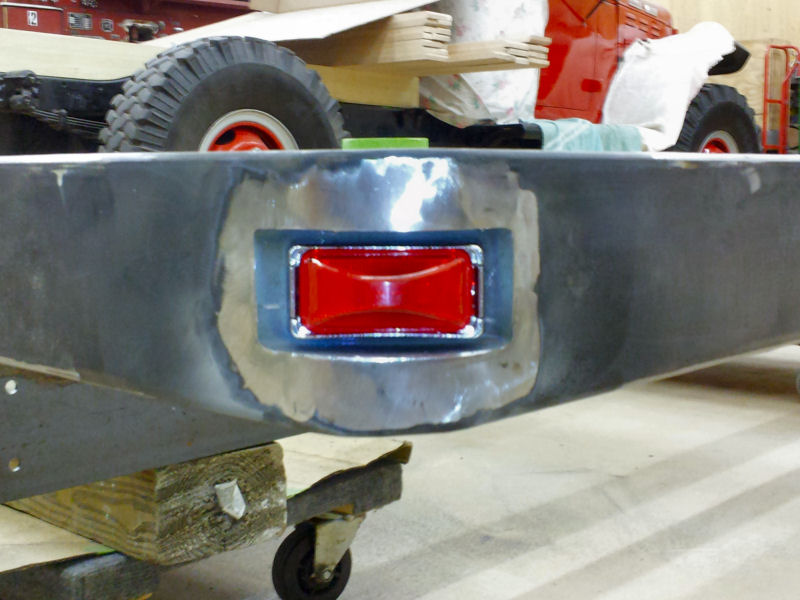
Well after picking up a fresh MIG Welding gads bottle, I went to work of welding in the stake pockets, then cutting and fitting in the clearance lights and smoothing al required welds. Now it's ready for sandblasting. It's been a long day of welding, grinding, cutting, repeat. 2012-05-21 | |
|
|
Loaded the bed frame and took it to the sand blaster. After cleaning up the mess I left in the shop, I set up the bed floor wood and prepped it for and then stained it. I should have the blasted frame back tomorrow, and will be able to start applying Polyurethane on the floor boards. 2012-05-22 | |
|
|
Spent the day applying three coats of the Varathane Outdoor Oil Based Spar Urethane in Satin on the bottoms of the bed wood floor. I also painted the wood filler blocks that go between the truck frame and the bed frame. I got the bed steel frame back from the sand blasters, and have it primed and ready for final sanding and paint. 2012-05-23 | |
|
|
Well, I ran out of black paint. Probably just as well, the wind was getting so bad more paint was blowing away than was getting on the frame. I did get some more paint, so hopefully tomorrow morning I can finish painting it. 2012-05-24 | |
|
|
Well, just as soon as I sprayed the back of the bed, I knew it. It was going to run even though it looked smooth and clean. Sure enough it did. So now I'll do some sanding tomorrow and re-paint the show surfaces of the bed. Oh well, I'm still not a painter. They don't show in the picture, but believe me they are there and ugly. Went to Polyurethane the top side of the bed floor wood, and I had some drips on it from doing the bottom, so I cleaned/sanded them as needed, but they need to cure a little in the areas before I can apply the top three coats. On another note I wend to see Battleship, dang good movies, makes me proud to me an American from Missouri. 2012-05-25 | |
|
|
Started the day by sanding out the runs in the paint from the first paint job, I then prepped and set up for painting. No new runs, but I apparently didn't get all the sags out of the first paint job while sanding. At the right angle and light they are visible, but oh well I'll live with them. I'm also making a few stake pocket cut adjustments to the wood floor and am giving it the three top coats of Polyurethane. 2012-05-26 | |
|
|
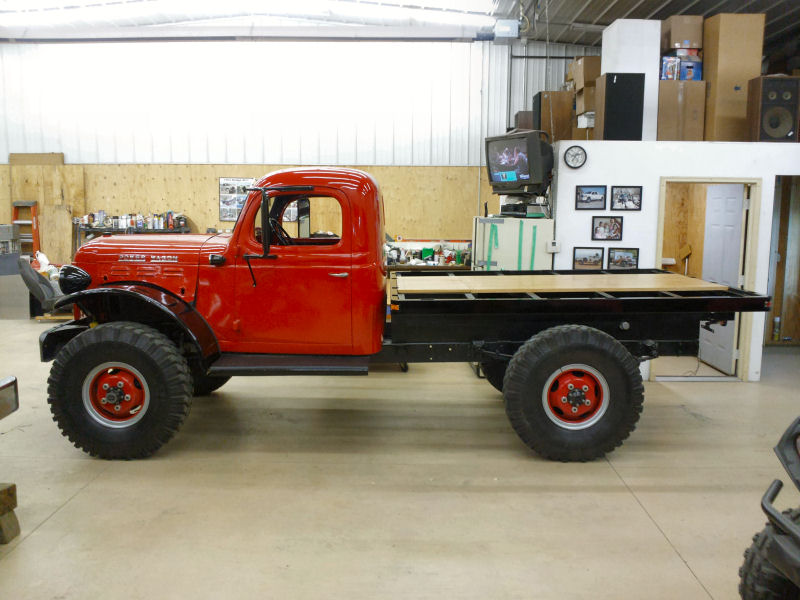
Spent the afternoon wiring and installing some of the floor before setting the bed onto the truck. Boy is there a lot of wires to connect on a bed with clearance lights and tail lights, should have planned it better I guess, but they are all connected and work. Boy does my hands hurt after screwing 7 boards down, 94 screws, only 88 more to go. The bed is set and loosly bolted in place. 2012-05-27 | |
|
|
Honoring Memorial Day, I had the M37 out with the flags flying, so after installing the PW's mud flaps and remaining bed floor boards, I got the truck out for some photos and shot the M and Power Wagon together. God Bless the USA and all the troops who have and do serve. The last picture will show a comparison between October 2004 and today. 2012-05-28 | |
|
|
A Great day today. Not as much wood work as I wanted, but we now have grandchild #5, or grandson #2. I got the stake side wood drilled and then cut to length. Next is sanding, staining and urethaneing. 2012-05-29 | |
|
|
Well after sanding and then cleaning up the mess I was able to stain the stake side boards. Now for them to dry so I can polyurethane them. tomorrow will be a long day of urethaning. 2012-05-30 | |
|
|
Well, a long day and late night of urethaning. Ended up even having to go buy a 4th quart to finish the job. Now for assembly. 2012-05-31 | |
|
|
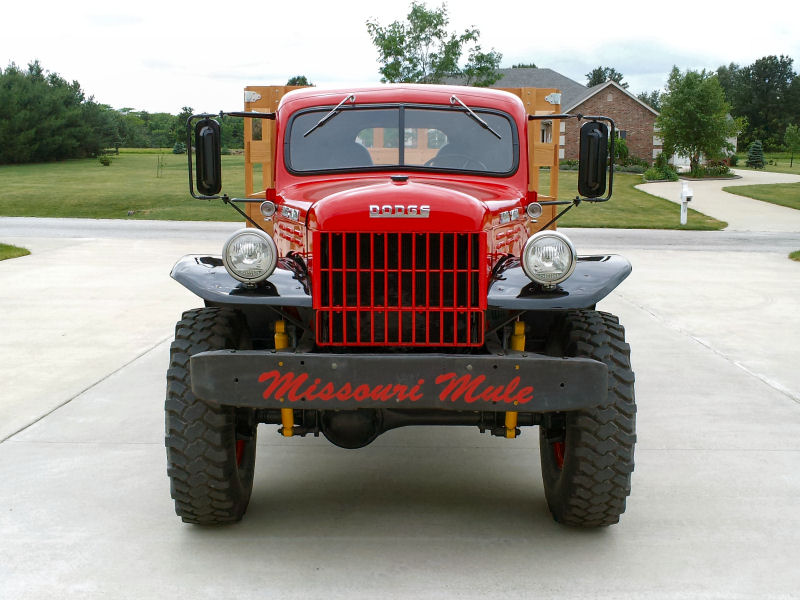
Well, with the exception of installing the Front License Plate/bracket, the In Cab Rear View Mirror, and the front bed mounting brackets, it's ready for Iowa. I'll take care of those items tomorrow morning as I need to pick up a few fasteners. It still needs a new front bumper, fuel filler neck and the carburetor rebuilt, but I do believe the brake job is done. The last two picture are nice comparisons of the truck. 2012-06-01 | |
|
|
I finally got around to splitting the rear stake side into two pieces. 2012-08-28 | |
Return to "Pop's" 1949 Power Wagon Page
![]()
![]()
AllPar . com DODGE Talk . com MIJC . org
W_A_Watson_II at Hotmail