Since the Truck didn't have the correct Dodge in-line 6,
and the Plymouth 218 is did have being well worn, it was time to add some
modern power and convenience, a 1990 Dodge 318 V8 fitted with a 46RH
(A518) Automatic Transmission and NP241 Tracsfercase.� Picture and
details to come.
11/19/2019
The Donor OFF WITH HER HEAD!
Well Off with the Engine Head that is. Pulled out the 1990 318 from a W250
with 102K miles to prep it for a project. Started with a compression test,
and it wasn�t good. I started with the cylinders soaked with some oil
even though the engine wasn�t stuck to lube everything up. After turning
it over a few times by hand and adding some more oil I started the test.
It took a while and a few test to get the rings to seal and the
compression to seem to stabilize. Here are the results:
1 - 182
2 - 155
3 - 160
4 - 120
5 - 165
6 - 125
7 - 124
8 - 45 (yes 45!)
After the test, I proceeded to clean the engine off and then removed the
wiring harness. I have the entire trucks wiring harness and dash and a new
TBI, so my plans are to strip out everything in the harness/dash I don’t
need/want and use the stock 1990 computer to control the engine and
transmission only.
11/20/2019
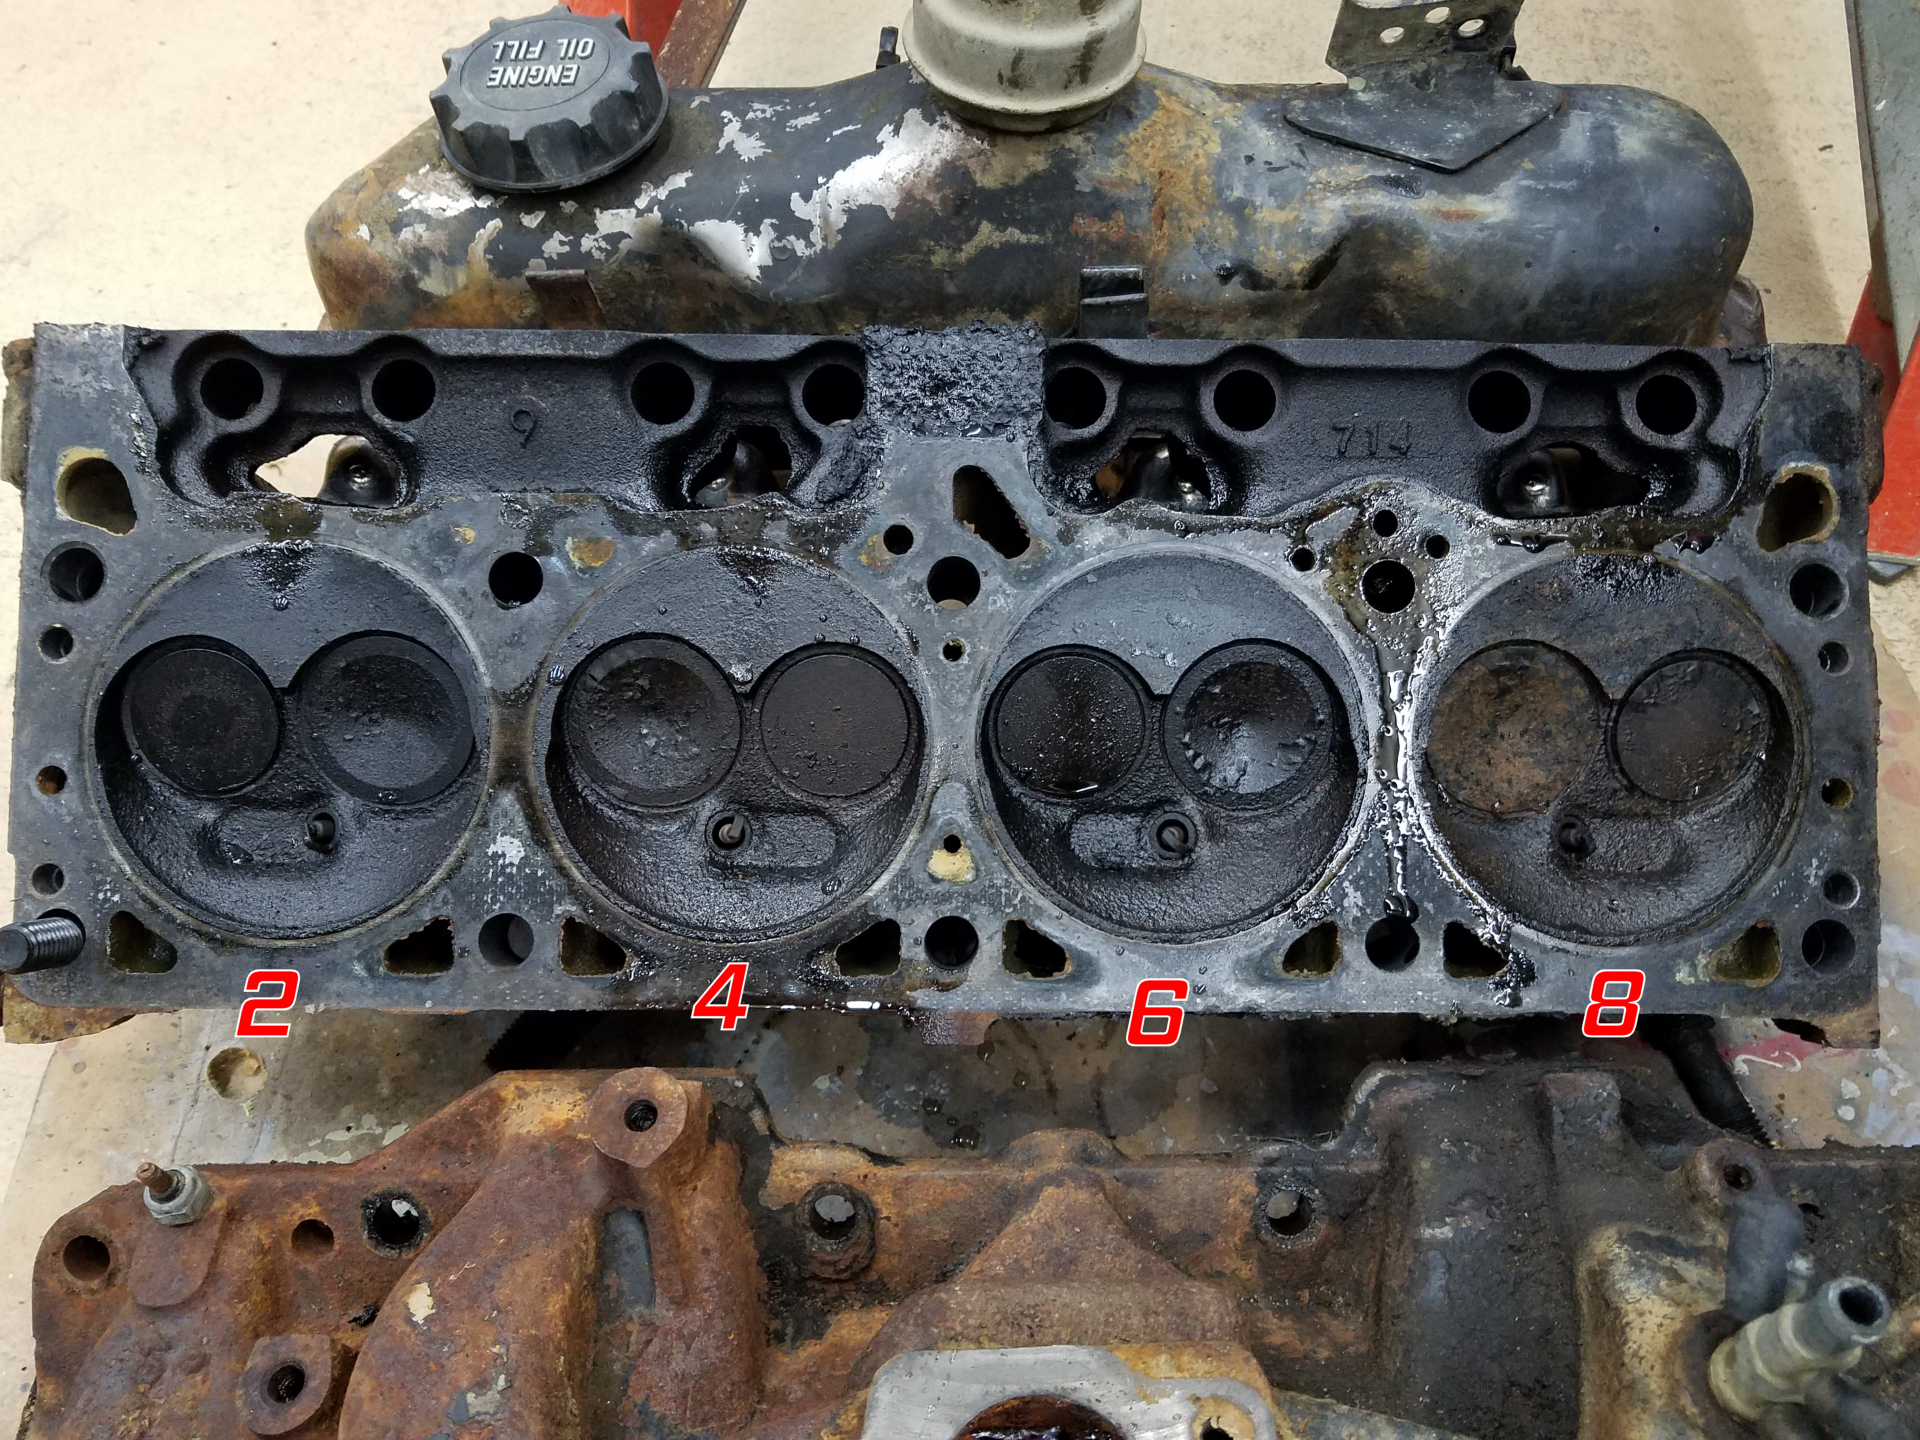
Tearing Down the Donor The heads were as nasty as I expected, but was shocked to see
cylinder #7 looking worse than #8.
After cleaning the cylinders and valve train valley as well as some of the
external areas, I'm in a bit of a quandary. Everything cleaned up nice,
but cylinder walls 7&8 have some surface issues.
I've still got to drop the pan and see what the lower side of the engine
looks like. But dang guess it set for a while with a valve on 7&8 open
before I got it, as I've kept it inside for the 11.5 years I've had it.
11/21/2019
Further Teardown Took the heads to the machine shop for a valve job and cleaning.
I proceeded with a little more disassembly and cleanup, including cleaning
out my parts washer in preparation for use. The oil pan had some gunk, the
pickup screen was clean. The initial inspection of the lower end of the
engine looks good.
I was shocked to see how clean the inside of the water pump was, but will
replace it as the bearing has a little rust. I'll drop the trans pan next
so see how it looks inside before separating it from the block.
11/22/2019
Push Rods
11/23/2019
Cracked Heads Well, one step forward and two back. After cleaning the push rods
I noticed the rocker end looks a little more wore than the lifter end but
wasn't too concerned.
Then I got a call from the Machine Shop (Donnelly Automotive Machine, a
great shop). The heads have cracks! repairable but not reliable, but might
work for a low use low abuse engine.
Now what do I do, put more money in the heads, try and find another used
set, or buy new AL heads? If I go with new, then I'm forced into doing a
better lower build to support the investment.
Decisions, Decisions. Any ideas from the masses?
12/12/2016
Wiring Harness work Well, I'm finally feeling pretty good, still some congestion and
a little coughing, but sleeping well, and enjoying time back in the Shop.
Started stripping the un-needed/not-wanted wires from the 1990 Dodge
Wiring Harness. I'm only planning on using the engine control, and
necessary Dash items from the truck, so I'm stripping all the lighting,
emissions, accessories, etc... The Power Wagon is already wired for
everything, so this will then be an engine control only harness.
Cleaning up the Engine Harness is simple, just need to remove three wires
from the harness connector and it's done.
The Chassis Harness, well now that is a different item. I've removed most
of the un-deeded items and identified almost all wires/connectors. The fun
on it will come when I install it in the truck and have to start
shortening the harness to fit. So once it's stripped of the extra
circuits, it will be left as mostly bare wire for that cut and shorten
activity.
Next will come the Dash Harness. I hope in the end it works and I'm not
scrambling to install an aftermarket TBI system.
12/13/2016
Wiring Harness Work Well, a little more cleanup of the Engine and Chassis Harness,
then the deep dive into the Dash and it's Harness.
It's a lot thinner, and I've got a few ground/dash light wires to tend
with on the install. I'll also take care of installing the check
engine/maintenance lights as well a brake signal. It will also need
connecting the existing start switch.
I hope I got all the right wires out and left behind, but I'll know when
the time comes to test and engine with it.
12/16/2016
2nd Motor and the needed Transfercase Picked up the NP241D Transfercase, and the attached 318 and
transmission, Thanks Doug!
Hopefully the heads on this engine are not cracked and what I need to move
forward with the project.
12/17/2016
Teardown of 2nd Motor Well, the weather changed my plans, so after some ice removal I
did get a few hours in the shop.
I tore into the 1989 motor and was pleased to find a good looking
internals and nice looking cylinder walls and piston tops.
The engine has about 120K miles on it, and was a running engine when it
was recently pulled. It did have an overheating problem, and was leaking
coolant.
I was happy to see a set of heads that look pretty good to my naked eye.
I'll take them into the machine shop and have them checked out.
I also pulled the NP241D Transfercase and test fit it onto the 1990 46RH
(A518) 4-speed transmission. As expected it fit correctly, the donor had a
36RH (A727) 3-speed transmission.
12/18/2016
Cooling passages Well, for those following my pre-magnum late model LA engine
activity, here is a new update.
I removed all 10 freeze plugs and, well was greeted with a slimy/chunky
wet mix. The block will have to be further disassembled and boiled clean,
so I'll also have it re-honed and deked before re-assembly with a fresh
set of rings.
You can still see some of the factory hone marks from the top of the
block, and easily see them from the bottom side. So other than some nasty
coolant at some point in it's life the block is looking good.
Oh, I managed to smash my thumb, so in a couple of months I'm sure to get
e new thumb nail.
12/19/2016
More Teardown After dropping the heads off at the machine shop and running some
errands and getting in a little archery, I finished tearing down the
block.
The main bearings and connecting as well as pistons looked good. The
carbon/ring at the top of the cylinder bore wasn't enough to make it hard
to get the pistons out.
The cam bearings showed more wear than the crank, but I also had a worn
spot on all 16 lifters, now what to do about them?
The cylinder walls looked decent, a little pitting on several, but much
better than the other block I started with.
I'll drop the block off at the machine shop and have it cleaned, new cam
bearings and a fresh honing.
12/22/2016 �
Parts Layout Just to keep you posted on the Engine Work.
While I wait for the Heads and Block to be done at the Machine Shop, I've
been slowly and sometimes painfully cleaning parts.
12/27/2016 �
Parts Picked up the Block, Crank, Intake and Rocker Arms from the
machine shop (Donnelly Automotive Machine).
They Block was cleaned, new cam bearings installed, honed and checked,
very little wear at 1 to 2 thousandths. The crank was polished and
checked, and measurements came in at standard. The heads didn't have any
cracks and look good, but won't be ready for a few more days.
The rest of the parts cleaning and preparing is coming along well. I also
moved the first engine over to my other engine storage stand (after some
modifications and adding casters).
Now just need some new rings and bearings and assembly will start.
1/3/2017�
Title Picked up the Block, Crank, Intake and Rocker Arms from the
machine shop (Donnelly Automotive Machine).
They Block was cleaned, new cam bearings installed, honed and checked,
very little wear at 1 to 2 thousandths. The crank was polished and
checked, and measurements came in at standard. The heads didn't have any
cracks and look good, but won't be ready for a few more days.
The rest of the parts cleaning and preparing is coming along well. I also
moved the first engine over to my other engine storage stand (after some
modifications and adding casters).
Now just need some new rings and bearings and assembly will start.
1/4/2017
Stopped by the Machine Shop and Phil pressed out the wrist pin from piston
#8, lightly polished the pin, mic'd it and installed it back correctly. it
hadn't slipped and apparently was installed wrong from the factory back in
'98.
Swapped the '89 3 speed onto the '90 engine, and have it ready to back to
engine row, that is once I can get to that location in the shop again.
I cleaned up the exterior of the transfercase some and don't expect to
have to do anything else to it. I will however have to rebuild the 1990 4
speed transmission.
I cleaned up the camshaft and further cleaned up the intake manifold.
before going to prepare the spare TBI I had gotten with the 1990 motor. It
turned out that the new TBI was actually from a 1988 318, but I think it
will work. If not I'll clean up the once from the 1989 as it was a good
working unit.
Next came the cleaning of the tools (and some work surfaces) so I can
start the engine assembly without getting too much grease and crud on the
new and clean parts.
1/5/2017
Well, a little progress today. It seems when you discover your 1/2" Torque
Wrench is broke and your waiting on a part you just don't go very far.
I fortunately had another smaller 3/8" torque wrench that I made do with
for the main and worked for the connecting rods/oil pump.
I need the Timing chain Tensioner Retaining Plate before I can check the
cam timing and then install the heads. It kept getting back ordered and
ended up being on National Back Order. So I canceled the Mopar brand and
ordered the Cloyes brand part. Hope to have it tomorrow.
1/6/2017
Well, a little progress today. It seems when you discover your 1/2" Torque
Wrench is broke and your waiting on a part you just don't go very far.
I fortunately had another smaller 3/8" torque wrench that I made do with
for the main and worked for the connecting rods/oil pump.
I need the Timing chain Tensioner Retaining Plate before I can check the
cam timing and then install the heads. It kept getting back ordered and
ended up being on National Back Order. So I canceled the Mopar brand and
ordered the Cloyes brand part. Hope to have it tomorrow.
1/9/2017
Well after some more cleaning and prepping, it was time to spray the Epoxy
Primer. So next comes some color.
1/10/2017
Well, color applied as well as the clear coat.
I oh so wish I had quality spray guns and a proper clean paint booth! But
it's not a show engine so it should be just fine.
Once it cures better I'll assemble what I can before moving on to the
other parts.
Guess now I'll have to decide if I'm attempting my first Automatic
re-build or I find someone who can do a good job. When I rebuilt my Jeep
the Automatic was the only items I didn't rebuild, and it's the only item
that still gives me problems
1/10/2017
Dave Lennie, well I was just going to wrestle it around on the bench, but
after watching a video and with your previous post, I decided to use the
engine stand.
First I had to transfer the Engine back to the floor stand, but that meant
without a transmission attached I needed to build some rear legs. So I
did, but I did not have another swivel dolly wheel, so it's not complete,
but setting on blocks.
Next it was thinking through how I could/should build the adapter. Well
what you see is my third idea. I did have to go back and add the cross
brace as the brackets would rotate a some.
It should work well and allow me to access all the required areas for the
teardown and build. The fuild had been previously drained, but what was
left in the torque converter says burnt. You can also see some of the
debris on the filter.
The case numbers are: K4505154 0344 5742 (Missing a leading P?)
Now to tear it down and get the rebuild kit and parts.
1/13/2017
Well, here is a pile of parts, Automatic Transmission A518/46RH Parts that
is. Initial looks at the clutch packs look good, however the 1st/Reverse
Band and Drum look like the problem area.
All in all it wasn't too complex, just had to keep checking and
re-checking the order and how to. I still need to disassemble the OD unit,
but it has the 800 pound spring and I'll either need a special tool, or a
press to do it.
Overhaul kit and shift kit are on order, and after some counting (24
spline) and research I know what torque converter to order.
Now to start cleaning everything and getting ready for the parts to
arrive.
1/14/2017
Here you can see the 131 tooth 24 tooth spline Torque Converter, I've
found a PRO-King # CR61 is the correct replacement.
You can also see the good condition that the Front Band was in.
Next in order are the condition of the Clutch's: Front, Rear &
Overdrive Clutches. Based on a conversation with Alan Vanevenhoven, and
the conditions of everything I'm not planning of disassembling the OD unit
just to find it's Direct Clutch Pack in good condition.
When I went to pull the pump from the front of the case I noticed that it
had been removed before, indicating that it had this transmission had
likely been rebuilt once before in it's 102K mile life. I found further
evidence in what looks like vice teeth marks on the Planetarie Gear Cases.
The gears and their bearings are in good condition as well.
This transmission was out of the engine that had the cracked heads from
and from MI. I'm betting that this bare bones truck was a plow truck and
that likely explains the significant wear only to the Reverse/Manual 1st
Gear Band and drum.
Well, it looks like the 1990 and early 91 A518/46RH's used the old 6" 727
Reverse Drum. Which by my luck is not as readily available as the later
6.25" later units. I'll make a call to a place Alan recommended on Monday
and do some searching.
The case is, well cleaner. All the internals are nice and clean, and the
external part of the case, well it's not as bad as it was.
1/18/2017
Well, I've learned one thing. If the parts are not factory original, don't
try and find a correct replacement based on what came out of the vehicle.
The Torque Converter that was in the 1990 W250 A518/46RH was a 131 tooth,
11" dia., 4 pads with 5/16" x 24's on a 10" circle with a slotted hub and
24 spline Non-Lockup unit.
Every web site and manufacture kept pointing me in all kinds of directions
from different splines and sizes, but I could not find a 131 tooth unit.
Now yes I've counted the number of teeth many times (4+), and the one out
of the transmission is indeed 131 tooth. But when I pulled the pump I
noticed it had been pulled before, and finding vice marks on the case of
the planetary gears leads me to believe the Torque Converter was likely
replaced then with a rebuilt unit made with the wrong ring gear.
So after talking to Dacco I've come to the conclusion that I need a:
130 tooth, 11" dia., 4 pads with 5/16" x 24's on a 10" circle with a
sloted hub and 24 spline Non-Lockup Torque Converter (1.810 pilot and no
weights)
#526 - Low Stall (or #387 - High Stall)
A couple of others units are:
Pro-King (O'Reilly) PRO#CR61
Precision of NH #5409
So any one know of have any better advice?
1/19/2017
Transmission Parts arriving, hope to have the last parts to start the
re-build on it by Monday.
A few more parts. The Reverse/First Gear Band, HD Kevlar. I also picked up
the custom made (to my design) Alternator bracket that was machined for my
by Jason Britz, a great local guy. He did a great job and it's a shame to
paint it. I also got the tensioner for the alternator as well.
1/20/2017
Test fitting the new custom Alternator Bracket. This is not the correct
Belt, the One I'll use will be 2" shorter. Also I need to get a couple of
shorter bolts for the water pump/bracket.
The alternator clears the head by a solid 1/4" and it will not extend out
past the exhaust manifold. It will spin about 7% slower being driven from
the cranks front pullies but that should not be an issue.
1/23/2017
Well, today I tackled the Valve Body. It's now cleaned, shift kit'ed and
re-assembled. I also cleaned and sent through the pump.
Now I'm back to waiting on parts that were supposed to arrive tomorrow,
but not are delayed till Thursday. e-Bay shipper issue.
1/25/2017
Well, while I wait for a slow Shipper and slow First Class Postage for the
transmission parts I decided to paint a few more odds and ends.
1/26/2017
Well, the parts arrived, and I proceeded to assemble the transmission.
However not with out a couple of issues/problems.
Apparently the early A518/46RH doesn't use the exact same Reverse/1st Drum
from an A727. The A518/46RH Drum was further machined to ass a snap ring
to hole it in place in the rear of the case that the A727 doesn't use.
The bigger issue however was the Reverse Band was way loose, and I wasn't
sure I had it installed correctly. I tried placing the strut on the tip of
the rocker, and that allowed enough tension but after a phone call, and
finally finding a video Installing it like that was wrong. So further
investigation the "Good used" reverse drum was apparently re-surfaced, and
thus slightly smaller than stock. Had I known and some one told me I could
have ordered the required 0.15" longer strut that I now apparently need.
So to test and verify this I made a 0.15" longer strut, well I made two
the same length as stock before getting it right. (Cut twice and still too
short, apparently I cut on the wrong line not once but twice!) With the
0.15" longer strut I have adequate adjustment so now I'll be on the search
locally for it, or I'll have to order yet another part.
Sure was hopping to paint the transmission tomorrow, but oh well.
1/27/2017
Well, I'm now waiting on $5.69 part that's taking $7.25 to ship it to me!
It's the Sonnax 22900-15 0.15" longer Reverse Strut. Neither of the
Decatur Transmission shops had it so I had to order it.
So rather than wait, and since I was able to remove and install the strut
with out disassembling the transmission (only had to remove the valve
body) I went ahead and cleaned, primed, painted and clear coated it.
Now back to the waiting game.
2/6/2017
Well, the parts crept in through the past week, and I picked up the Torque
Converter on Saturday.
Got a little worried, the 0.15" longer Sonnax Strut was more the 0.15"
longer than the stock strut I removed from the transmission. IT was 0.225"
longer, and was a real bear to install. I was afraid I was going to have
to disassemble everything to get it installed, but I prevailed. It fits
good with the proper adjustment, the adjuster looks like it's about right
for use.
Well, the Torque Converter is a different story. The box was a disaster
when I picked it up from O'Reilly's, however I took it anyway. Upon
inspection the dust cap was broke with some debris inside the converter
(correct spline count though) and it had balance weights which were not
supposed to be on a 318 converter. I suspect the weights were to correct
rebuild issues, but not sure. With the debris and box condition with the
weights, I had O'Reilly's order another one, so I'm back to waiting on
parts, again.
I was able to assemble the rest of the Transmission while I wait for the
Converter so I can then mate it to the engine and start the final
assemble.
2/9/2017
Good parts finally arrived. The Torque Converter box wasn't in any better
shape than the previous one and was oil soaked. The clerk at O'Reilly's
had to re-tape it as best as she could for me to be able to carry it out
of the store. But the Torque Converter inside had a good dust cap and no
trash inside. It also looked to be better balanced, and amazingly had 131
teeth.
I installed the torque converter and then mated the engine to the
transmission. And well wouldn't you know the bolt spacing between the flex
plate and the torque converter are apparently not symmetric. I did find a
good pattern and was able to both them together.
Next came some more assembly, and then filling with fluids. With oil in
the engine and a filter installed it was time to prime the oil system. So
out came my custom oil drive shaft I used with Franky and the drill. Oil
system primmed fairly quickly and was getting 65 psi.
With everything in place and the oil system primmed I connected the
starter and used the compression tester just to see where the fresh engine
stood. The cylinder walls were lubed during assembly and none of the spark
plugs were in place. The oil pressure while cranking came to 30 psi.
1 - 160
2 - 170
3 - 165
4 - 175
5 - 160
6 - 175
7 - 180
8 - 165
A little more variability (160-180) than i wanted to see, but with new
rings and a fresh hone job on an non-ran engine it should not be an issue,
The alternator mount worked great and should be a winner. I did discover
I'll have to make a slight wiring harness change to get the alternator
wires into the proper position as the alternator location is a little
further away wire length wise.
Next comes some more wiring work, test stand cooling system installation
and a little more assembly and checking before I fire everything up for
the initial test.
2/10/2017
Well, now that the assemble is all together I'm not so sure it will fit in
the RZR!
Oh, well, lets put the seat in place and get a feel for how it might set.
Did a little engine wiring harness tweaking.
2/14/2017
Well, I know it's Valentine�s Day, but the Engine is at least Red.
I got to make the final electrical and fuel line connections and start the
1990 Dodge W250 318 Engine for the first time today. Thanks Brittaney for
helping me video it.
The first two attempts, well it didn't start, after a little checking I
discovered that the Auto Shut Down Relay, was bad, even though it was
clicking. As a result it was not turning on the fuel pump, and without
fuel they just won�t start and run.
This video starts out with the 3rd attempt, and as you can see, with the
fuel pump working it started right up.
I had to add 6 more quarts of ATF, and expected to have to add some. The
engine does run good and sounds strong, but it does seem to bog down and
die after running a little while.
After adding the ATF the transmission seems to work correctly. It does put
a little load on the engine while in reverse, but everything seems to be
correct and OK.
I did discover that the valve covers leak, so I�ll have to pull them and
add some sealer, and hopefully get them to not leak. The water temperature
sender I had installed was bad, and have since switched it out with
another good one. The speedometer works, as does the other gauges. The
charging system looks to be working strong, with 14.4 volts.
When I topped off the coolant before test firing it I was hit with my
curse. A coolant leak, at the thermostat. So off it came and I used some
sealant, but to no avail, it�s still leaking, Ug, so in addition to the
valve covers I get to fix a coolant leak. The radiator leak is no issue as
that is my engine test radiator and won�t be used as the engine gets a
home.
3/21/2017
Removed old Motor from PW
3/25/2017
Fit the New Motor into the PW
3/26/2017
Well, I understand that it's not cool to put an Automatic in a Power
Wagon, but I now know why it's not done, it just doesn�t fit well
physically.
That being said I will succeed in doing it, just not
an easy job, and the engine will have a little more slop than I'd like.
I've been looking at solving the exhaust to steering box interference. So
as I can't raise the front of the engine any without further aggravating
the engine slop issue since the transmission almost hits the bottom of the
cab I considered moving the engine further forward.
Will that isn't an option, the engine with the 1990 pullies at the lower
installation position is just s snug fit between the firewall and the
radiator support.
So now I've come to the realization that I'll have to buy a set of Block
Hugger Headers and modify the number 7 header exhaust routing.
I've also worked out the rear cross member basics as well. I'll need to
drill out and tap the rear most transmission extension mounting points to
keep the cross member as rearward as possible.